> ## Documentation Index
> Fetch the complete documentation index at: https://docs.bfl.ml/llms.txt
> Use this file to discover all available pages before exploring further.

# Quick Start

> Get started with FLUX in minutes — connect via MCP for instant image generation inside your AI tools, or use the API to build and integrate directly.

export const SetupSteps = ({tabs, queryParam = 'client'}) => {
  const [activeId, setActiveId] = useState(tabs[0].id);
  const [copiedKey, setCopiedKey] = useState(null);
  const active = tabs.find(t => t.id === activeId) ?? tabs[0];
  useEffect(() => {
    if (typeof window === 'undefined') return;
    const params = new URLSearchParams(window.location.search);
    const fromUrl = params.get(queryParam);
    if (fromUrl && tabs.some(t => t.id === fromUrl)) {
      setActiveId(fromUrl);
    }
  }, [queryParam, tabs]);
  const selectTab = id => {
    setActiveId(id);
    if (typeof window !== 'undefined') {
      const params = new URLSearchParams(window.location.search);
      params.set(queryParam, id);
      const newUrl = `${window.location.pathname}?${params.toString()}${window.location.hash}`;
      window.history.replaceState(null, '', newUrl);
    }
  };
  const copy = (key, value) => {
    if (typeof navigator !== 'undefined' && navigator.clipboard) {
      navigator.clipboard.writeText(value);
      setCopiedKey(key);
      setTimeout(() => setCopiedKey(curr => curr === key ? null : curr), 1500);
    }
  };
  return <div className="not-prose">
      <div className="flex justify-center mb-8">
        <div className="inline-flex gap-1 p-1 rounded-full bg-gray-100 dark:bg-white/5 border border-gray-200 dark:border-white/10">
          {tabs.map(tab => {
    const selected = activeId === tab.id;
    return <button key={tab.id} onClick={() => selectTab(tab.id)} className={`px-5 py-2 text-sm font-medium rounded-full transition-colors ${selected ? 'bg-white text-gray-900 shadow-sm dark:bg-white dark:text-gray-900' : 'text-gray-600 dark:text-gray-300 hover:text-gray-900 dark:hover:text-white'}`}>
                {tab.label}
              </button>;
  })}
        </div>
      </div>

      <div className={`grid grid-cols-1 ${active.steps.some(s => s.wide) ? 'md:grid-cols-4' : 'md:grid-cols-3'} gap-4`}>
        {active.steps.map((step, i) => {
    const key = `${active.id}-${i}`;
    return <div key={key} className={`rounded-2xl border border-gray-200 dark:border-white/10 bg-white dark:bg-[#0e1a14] p-6 flex flex-col ${step.wide ? 'md:col-span-2' : ''}`}>
              <div className="flex items-center justify-center w-9 h-9 rounded-full bg-primary dark:bg-primary-light text-white dark:text-gray-900 font-semibold text-sm mb-5">
                {step.number}
              </div>
              <h3 className="text-base font-semibold text-gray-900 dark:text-gray-100 mt-0 mb-2">
                {step.title}
              </h3>
              <p className="text-sm text-gray-600 dark:text-gray-400 mb-4 flex-1" dangerouslySetInnerHTML={{
      __html: step.description
    }} />
              {step.button && <a href={step.button.href} target={step.button.href.startsWith('http') ? '_blank' : undefined} rel={step.button.href.startsWith('http') ? 'noopener noreferrer' : undefined} className="self-start mt-1 inline-flex items-center gap-2 rounded-lg bg-gray-100 dark:bg-white/10 hover:bg-gray-200 dark:hover:bg-white/15 text-gray-900 dark:text-gray-100 text-sm font-medium px-3 py-2 no-underline">
                  {step.button.label}
                  <svg width="12" height="12" viewBox="0 0 24 24" fill="none" stroke="currentColor" strokeWidth="2.5" strokeLinecap="round" strokeLinejoin="round">
                    <path d="M7 17 17 7" />
                    <path d="M7 7h10v10" />
                  </svg>
                </a>}
              {step.code && <div className="mt-1 flex items-start justify-between gap-2 rounded-lg bg-gray-100 dark:bg-black/40 border border-gray-200 dark:border-white/10 px-3 py-2">
                  <code className="text-xs sm:text-sm font-mono text-gray-700 dark:text-gray-200 break-all whitespace-pre-wrap min-w-0 flex-1">{step.code}</code>
                  <button onClick={() => copy(key, step.code)} className="flex-shrink-0 text-gray-400 hover:text-gray-700 dark:hover:text-gray-100 mt-0.5" aria-label="Copy">
                    {copiedKey === key ? <svg width="16" height="16" viewBox="0 0 24 24" fill="none" stroke="currentColor" strokeWidth="2.5" strokeLinecap="round" strokeLinejoin="round">
                        <path d="M20 6 9 17l-5-5" />
                      </svg> : <svg width="16" height="16" viewBox="0 0 24 24" fill="none" stroke="currentColor" strokeWidth="2" strokeLinecap="round" strokeLinejoin="round">
                        <rect x="9" y="9" width="13" height="13" rx="2" />
                        <path d="M5 15H4a2 2 0 0 1-2-2V4a2 2 0 0 1 2-2h9a2 2 0 0 1 2 2v1" />
                      </svg>}
                  </button>
                </div>}
              {step.codes && step.codes.map((c, ci) => {
      const codeKey = `${key}-c${ci}`;
      return <div key={ci} className={`${ci === 0 ? 'mt-1' : 'mt-2'} flex items-start gap-2 rounded-lg bg-gray-100 dark:bg-black/40 border border-gray-200 dark:border-white/10 px-3 py-2`}>
                    {c.label && <span className="text-xs font-medium text-gray-500 dark:text-gray-400 flex-shrink-0 mt-0.5">
                        {c.label}
                      </span>}
                    <code className="text-xs sm:text-sm font-mono text-gray-700 dark:text-gray-200 break-all whitespace-pre-wrap min-w-0 flex-1">{c.value}</code>
                    <button onClick={() => copy(codeKey, c.value)} className="flex-shrink-0 text-gray-400 hover:text-gray-700 dark:hover:text-gray-100" aria-label="Copy">
                      {copiedKey === codeKey ? <svg width="16" height="16" viewBox="0 0 24 24" fill="none" stroke="currentColor" strokeWidth="2.5" strokeLinecap="round" strokeLinejoin="round">
                          <path d="M20 6 9 17l-5-5" />
                        </svg> : <svg width="16" height="16" viewBox="0 0 24 24" fill="none" stroke="currentColor" strokeWidth="2" strokeLinecap="round" strokeLinejoin="round">
                          <rect x="9" y="9" width="13" height="13" rx="2" />
                          <path d="M5 15H4a2 2 0 0 1-2-2V4a2 2 0 0 1 2-2h9a2 2 0 0 1 2 2v1" />
                        </svg>}
                    </button>
                  </div>;
    })}
            </div>;
  })}
      </div>

      {active.configCode && <div className="mt-8">
          {active.configCaption && <p className="text-sm text-gray-600 dark:text-gray-400 mb-3">
              {active.configCaption}
            </p>}
          <div className="relative">
            <pre className="rounded-xl bg-gray-100 dark:bg-black/40 border border-gray-200 dark:border-white/10 p-4 text-xs sm:text-sm font-mono text-gray-800 dark:text-gray-200 overflow-x-auto m-0">
              <code>{active.configCode}</code>
            </pre>
            <button onClick={() => copy(`${active.id}-config`, active.configCode)} className="absolute top-3 right-3 text-gray-400 hover:text-gray-700 dark:hover:text-gray-100" aria-label="Copy config">
              {copiedKey === `${active.id}-config` ? <svg width="16" height="16" viewBox="0 0 24 24" fill="none" stroke="currentColor" strokeWidth="2.5" strokeLinecap="round" strokeLinejoin="round">
                  <path d="M20 6 9 17l-5-5" />
                </svg> : <svg width="16" height="16" viewBox="0 0 24 24" fill="none" stroke="currentColor" strokeWidth="2" strokeLinecap="round" strokeLinejoin="round">
                  <rect x="9" y="9" width="13" height="13" rx="2" />
                  <path d="M5 15H4a2 2 0 0 1-2-2V4a2 2 0 0 1 2-2h9a2 2 0 0 1 2 2v1" />
                </svg>}
            </button>
          </div>
        </div>}
    </div>;
};

export const setupTabs = [{
  id: 'claude',
  label: 'Claude',
  steps: [{
    number: 1,
    title: 'Open Claude settings',
    description: 'Launch Claude Desktop or open <strong>claude.ai</strong> and go to Settings → Connectors.',
    button: {
      label: 'Settings → Connectors',
      href: 'https://claude.ai/settings/connectors'
    }
  }, {
    number: 2,
    title: 'Add a custom connector',
    description: 'Click <strong>Add custom connector</strong>, then fill in the name and the server URL.',
    codes: [{
      label: 'Name',
      value: 'FLUX'
    }, {
      label: 'URL',
      value: 'https://mcp.bfl.ai'
    }]
  }, {
    number: 3,
    title: 'Sign in',
    description: 'Click <strong>Connect</strong>, sign in with your BFL account, and choose the organization you want billed.'
  }]
}, {
  id: 'claude-code',
  label: 'Claude Code',
  steps: [{
    number: 1,
    title: 'Open your terminal',
    description: 'Claude Code installed? You are ready.',
    button: {
      label: 'Install Claude Code',
      href: 'https://claude.com/product/claude-code'
    }
  }, {
    number: 2,
    title: 'Add the MCP server',
    description: 'This registers FLUX as a remote MCP server in your Claude Code config.',
    code: 'claude mcp add --transport http FLUX https://mcp.bfl.ai',
    wide: true
  }, {
    number: 3,
    title: 'Sign in',
    description: 'A browser opens on first use. Sign in, choose the organization you want billed, then return to Claude Code.'
  }]
}, {
  id: 'cursor',
  label: 'Cursor',
  steps: [{
    number: 1,
    title: 'Install with one click',
    description: 'Click the button to open Cursor with the FLUX server pre-filled. Cursor will ask you to approve the install.',
    button: {
      label: 'Add to Cursor',
      href: 'cursor://anysphere.cursor-deeplink/mcp/install?name=FLUX&config=eyJ1cmwiOiJodHRwczovL21jcC5iZmwuYWkifQ=='
    }
  }, {
    number: 2,
    title: 'Approve the install',
    description: 'In Cursor, confirm <strong>Add server</strong> in the approval dialog. The entry is saved to your global <code>~/.cursor/mcp.json</code>.'
  }, {
    number: 3,
    title: 'Sign in',
    description: 'The first FLUX request opens a browser for OAuth sign-in. Tokens refresh automatically after that.'
  }],
  configCaption: 'Prefer manual setup? Paste this into .cursor/mcp.json instead:',
  configCode: `{
  "mcpServers": {
    "FLUX": {
      "url": "https://mcp.bfl.ai"
    }
  }
}`
}, {
  id: 'codex',
  label: 'Codex',
  steps: [{
    number: 1,
    title: 'Open your terminal',
    description: 'Codex installed? You are ready.',
    button: {
      label: 'Codex config docs',
      href: 'https://developers.openai.com/codex/config-reference'
    }
  }, {
    number: 2,
    title: 'Add the MCP server',
    description: 'This registers FLUX as a remote MCP server in your Codex config.',
    code: 'codex mcp add FLUX --url https://mcp.bfl.ai',
    wide: true
  }, {
    number: 3,
    title: 'Sign in',
    description: 'Codex detects OAuth support and opens a browser automatically. Sign in, choose the organization you want billed, then start a new Codex session so the FLUX tools are loaded.'
  }]
}, {
  id: 'windsurf',
  label: 'Windsurf',
  steps: [{
    number: 1,
    title: 'Open the Windsurf MCP config',
    description: 'Edit <code>~/.codeium/windsurf/mcp_config.json</code>, or open <strong>Cascade → Plugins → Manage plugins → View raw config</strong>.',
    button: {
      label: 'Windsurf MCP docs',
      href: 'https://docs.windsurf.com/windsurf/cascade/mcp'
    }
  }, {
    number: 2,
    title: 'Add the FLUX server',
    description: 'Drop the JSON below into your config. Note that Windsurf uses <code>serverUrl</code>, not <code>url</code>. OAuth is handled automatically.'
  }, {
    number: 3,
    title: 'Reload plugins',
    description: 'Refresh plugins from the Cascade panel. The first FLUX call opens a browser for sign-in.'
  }],
  configCaption: 'Windsurf MCP config — paste this into ~/.codeium/windsurf/mcp_config.json:',
  configCode: `{
  "mcpServers": {
    "FLUX": {
      "serverUrl": "https://mcp.bfl.ai"
    }
  }
}`
}, {
  id: 'mcp-remote',
  label: 'Other MCP clients',
  steps: [{
    number: 1,
    title: 'Run the bridge',
    description: 'Use this when your client supports stdio MCP servers but does not handle the OAuth flow on its own — for example <strong>Hermes</strong> (Nous Research) and similar tools that only accept static bearer tokens. A browser opens for sign-in; tokens cache to <code>~/.mcp-auth/</code> and refresh automatically.',
    code: 'npx -y mcp-remote https://mcp.bfl.ai',
    wide: true
  }, {
    number: 2,
    title: 'Add it to your config',
    description: "Register FLUX as a local stdio server in your client's MCP config. Use the JSON example below and adapt the server name if needed.",
    button: {
      label: 'mcp-remote docs',
      href: 'https://www.npmjs.com/package/mcp-remote'
    }
  }, {
    number: 3,
    title: 'Restart the client',
    description: 'Your client talks to local stdio. mcp-remote forwards requests to <code>https://mcp.bfl.ai</code> over HTTP and keeps OAuth tokens fresh.'
  }],
  configCaption: 'For stdio-based clients, the MCP config usually looks like this:',
  configCode: `{
  "mcpServers": {
    "FLUX": {
      "command": "npx",
      "args": ["-y", "mcp-remote", "https://mcp.bfl.ai"]
    }
  }
}`
}];

<Tabs>
  <Tab title="MCP">
    Most modern MCP clients can connect to `https://mcp.bfl.ai` directly and handle the OAuth flow on their own — pick your client from the tabs below.

    For stdio-only or OAuth-incompatible clients (for example Hermes), use the `mcp-remote` fallback tab. It runs locally, handles the browser OAuth flow, refreshes tokens for you, and exposes FLUX as a normal stdio server.

    <SetupSteps tabs={setupTabs} />

    <br />

    <br />

    <Note>
      See our [full pricing page](/quick_start/pricing) for complete details or use the [pricing calculator](https://bfl.ai/pricing).
    </Note>
  </Tab>

  <Tab title="API">
    Start generating AI images with FLUX in three steps: create an account, add credits, and make your first API call.

    <Steps>
      <Step title="Create your account">
        Go to [dashboard.bfl.ai](https://dashboard.bfl.ai) and register your account. You'll need to confirm your email before logging in.

        <Frame caption="Register on our platform">
          <img src="https://cdn.sanity.io/images/2gpum2i6/production/b8fdb612d1a9f6e05d874ed348035be6b213f37f-458x577.jpg" alt="BFL API registration page" />
        </Frame>

        When you create your account, we automatically set up:

        * A **Default Organization** - your workspace for managing team members and billing
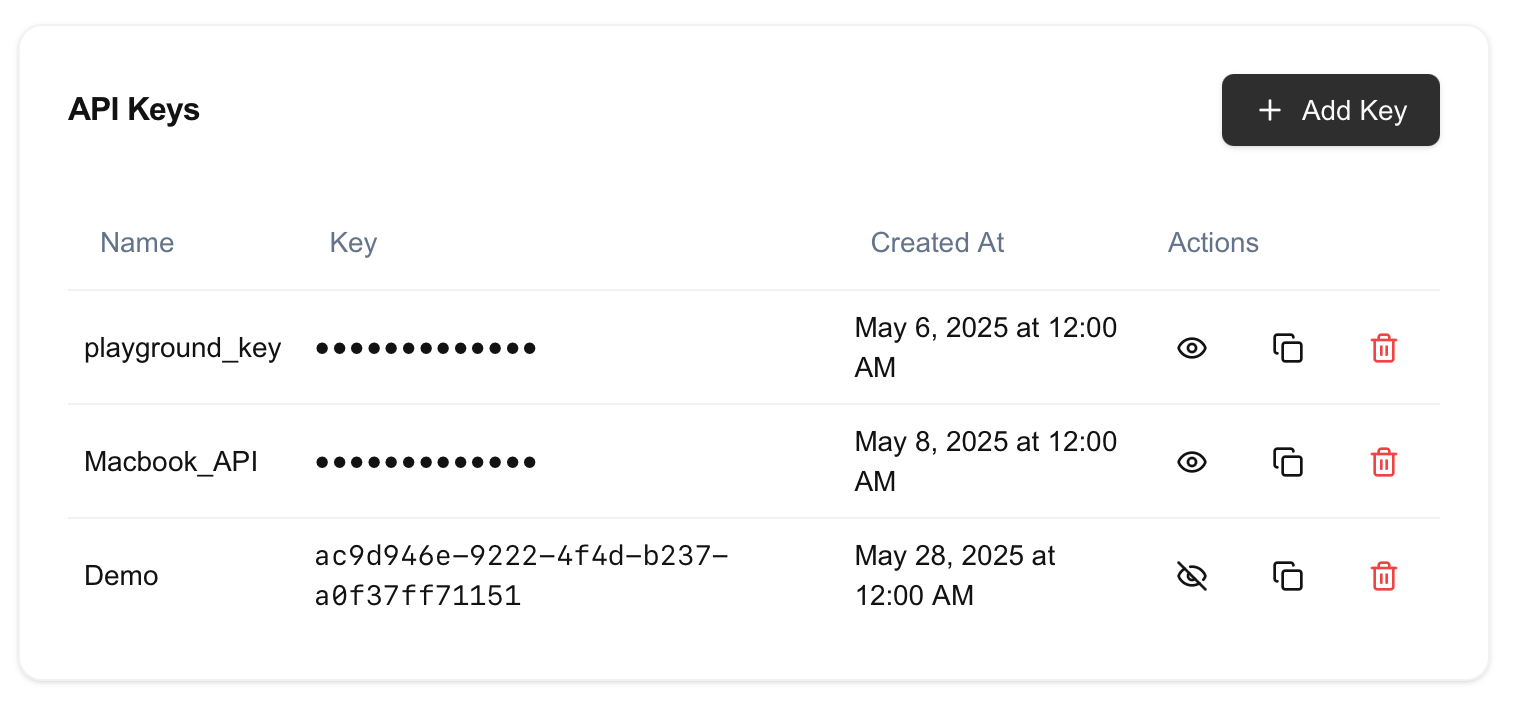
        * A **Default Project** - where your API keys and usage are tracked

        <Tip>
          **Organizations** group your team and billing. **Projects** isolate your work with separate API keys and usage tracking. Think of organizations as your company and projects as different apps or environments.
        </Tip>
      </Step>

      <Step title="Add credits to your account">
        Credits power all API and Playground usage.

        <Info>
          **Simple pricing:** 1 credit = \$0.01 USD
        </Info>

        **To add credits:**

        1. Go to [dashboard.bfl.ai](https://dashboard.bfl.ai)
        2. In your organization sidebar, navigate to **API → Credits**
        3. Click **Add Credits**
        4. Choose your amount and complete payment via Stripe

        <Frame caption="Click Add Credits to purchase">
          <img src="https://cdn.sanity.io/images/2gpum2i6/production/b54ba89a056e4dfca58796c31cd1b20b74b44777-533x262.jpg" alt="Add credits button in dashboard" />
        </Frame>

        <Tip>
          Credits are available immediately after payment. Start with \$10-20 to experiment with different models.
        </Tip>

        [Full credits & billing guide](/account_management/credits_billing)
      </Step>

      <Step title="Create your API key">
        <Info>
          **Prefer an interactive experience?** Use our [Dashboard Quickstart](https://dashboard.bfl.ai/get-started) to create your API key and make your first call.
        </Info>

        Navigate to **API → Keys** in your project sidebar and click **Add Key**.

        <Note>
          Give your API key a descriptive name that helps you identify its purpose later, like "Production App" or "Testing Environment". Each API key is scoped to its project.
        </Note>

        <Frame caption="Create your FLUX API key">
          <img src="https://cdn.sanity.io/images/2gpum2i6/production/e2bcb3baf7581033da4a6d1009620876c3391b0d-1056x510.png" alt="Click Add Key to create API access" />
        </Frame>
      </Step>

      <Step title="Copy your API key">
        Your new API key will be displayed. **Copy it now** - for security reasons, you won't be able to see the full key again.

        <Warning>
          Your API key is only shown once when created. Make sure to copy and store it securely before closing the dialog.
        </Warning>

        <Frame caption="Copy your API key - it's only shown once">
          <img src="https://cdn.sanity.io/images/2gpum2i6/production/0c02795975ab4f7f0ac953ccf0f9745ecd5c2cb4-1516x708.png" alt="Copy your API key" />
        </Frame>
      </Step>

      <Step title="Set up your environment">
        Add your API key to your environment variables:

        ```bash theme={null}
        export BFL_API_KEY="your_api_key_here"
        ```

        Or store it securely in your application's configuration.

        <Tip>
          Keep your API key secure and never expose it in client-side code. Treat it like a password!
        </Tip>
      </Step>

      <Step title="Make your first API call">
        Generate your first image with FLUX.2. See the [image generation guide](/quick_start/generating_images) for complete code examples in Python, TypeScript, and cURL.

        <Tip>
          Want to skip the code? Try our [Playground](https://playground.bfl.ai) to generate images directly in your browser.
        </Tip>
      </Step>
    </Steps>

    <Note>
      See our [full pricing page](/quick_start/pricing) for complete details or use the [pricing calculator](https://bfl.ai/pricing).
    </Note>
  </Tab>
</Tabs>

## Next Steps

<Columns cols={2}>
  <Card title="Generate Your First Image" icon="image" href="/quick_start/generating_images">
    Learn how to create images using our API
  </Card>

  <Card title="Try the Playground" icon="play" href="https://playground.bfl.ai">
    Test models instantly without writing code
  </Card>

  <Card title="Explore FLUX.2" icon="sparkles" href="/flux_2/flux2_overview">
    Our latest and most powerful model family
  </Card>

  <Card title="Prompting Guide" icon="graduation-cap" href="/guides/prompting_summary">
    Get better results with effective prompts
  </Card>
</Columns>
